In the realm of operating systems, Windows provides users with a diverse range of integrated tools that are specifically designed to assist in capturing screenshots. Despite the availability of these tools, some individuals may encounter difficulties when attempting to perform basic tasks using them. The main objective of this comprehensive guide is to offer a detailed walkthrough of the step-by-step process for capturing screenshots of various sizes effortlessly. An effective approach involves utilizing Greenshot, a highly user-friendly software that is available for free and greatly streamlines the screenshot capturing process. By making use of this tool, users can improve their screenshot capturing experience, ultimately leading to achieving optimal results with a high degree of ease and efficiency.
Greenshot is very easy to install, just run the installer program, follow the on screen instructions and you’re done. Greenshot doesn’t come with any spyware, adware, or unwanted programs which is really a nice change of pace compared to most of the other “free” software on the internet.
Once Greenshot is installed and running is sits in your system tray at the bottom right of your screen.
To use Greenshot to take a screenshot, just right click the icon and select one of the 5 capture modes from the top of the list.
I normally select either “Capture region” or “Capture window” depending on what type of screen shot I’m taking. Capture region will let you use your mouse to select exactly the area of the screen you want to take a screen capture of, and Capture window lets you select a window you have open on your computer and capture just the interface of that window.

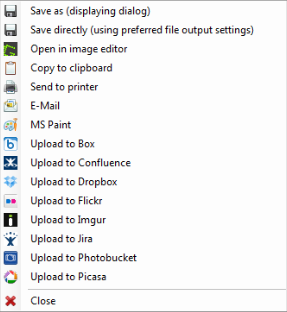
After Greenshot has taken your desired screenshot, it’ll show you another menu with options of what to do with the image you just capture. There’s the normal “Save file” options, but Greenshot also has the ability to directly upload image to various image hosting websites, the print your image automatically using your printer, or even to open the image up in Greenshot’s own builtin image editor if you need to make changes or annotations.

Because I do a lot of software and websites reviews I end up using Greenshot on a daily basis. It’s made taking good-looking screenshots an quick and easy process and saved me probably hours of time by now that I would have otherwise spent mucking around in an image editor trying to edit the screenshots Windows takes. I’d recommend it to anybody.
Greenshot can be downloaded from the Greenshot website here: http://getgreenshot.org/
Got a computer problem you just can’t solve on your own? ZookaWare ITZooka technicians are here for 24/7 remote technical support.
